Navigation
Navigation
To begin, navigate to:
- Settings
- Select "General Settings"
This interface is composed of the following sections:
- General
- Pillar 1: Ambition
- Pillar 2: Insight
- Pillar 3: Power Base
General settings
General settings
In General, you can modify:
Currency
Type in the currency you would like your users to use when uploading financial information. For example, USD, Euros, etc.
Cadence frequency
Use the arrows to adjust the frequency you want account plans to be refreshed. Typically, Priority 1 accounts are reviewed every 3-4 months and Priority 2 accounts are review every 6-8 months.
Once set, every time an account is added to Coro, the date of next review will be guided by this frequency (unless you over-ride the due date).
CRM Admin Contact Info
Input the email address, URL or instructions you would like your team to follow when they have questions about Coro. Typically, you input your CRM Admin contact info. Typically, CRM admins are able to resolve Coro specific questions. If the issue is too difficult, the CRM Admin team can escalate to Coro Help Desk
Pillar 1: Ambition
Pillar 1: Ambition
Customer satisfaction
You can choose whether you want to display a Customer Satisfaction question to your sales team. If turned on, the sales team will be prompted to answer:
- “Strength of relationship with the Executive or Buyer”: Scale of 1-5
If you collect customer satisfaction/nps elsewhere you, might consider turning off this question
Custom Field #1
If you believe you would like to add an additional question to the Ambition section, include the custom field.
Once on, you will be prompted to input:
- Menu title (less than 25 characters): which will be displayed underneath “Health Check” on the navigation bar on the left side of the screen
- Question: The additional question you would like the sales team to answer
Note: this additional question will be a free text response.
Pillar 2: Insights
Pillar 2: Insights
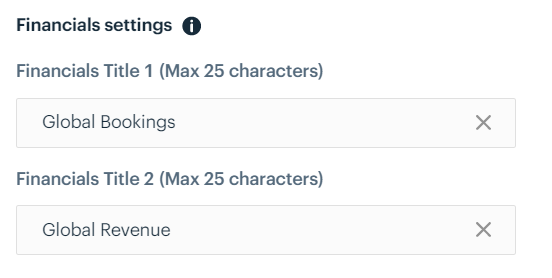
Financial Settings
Within financials, you can upload 2 sets of data. You can choose what labels you would like to include for the tabs in the financials section (see image below). Using free text, enter the financial information you would like included for each section.

Product Category and Sub-category settings
When information is entered into Coro, you can select whether you would like it entered and displayed at a category or sub-category level.
Of note, if you choose to fill-out the Share of Wallet information at a category level, sales reps will only be prompted to enter estimated share of wallet at the Category level.
Key considerations: If you have included many categories and sub-categories in your Product Hierarchy, it is best to use the Category Level. If your Product Hierarchy is limited, then using the sub-category is an option as well.

Custom Field #2
This is a second option to add a custom field. See instructions in Custom Field #1 for set-up details
Pillar 3: Powerbase
Pillar 3: Powerbase
Decision matrix settings
When filling out the prioritization of key contacts, sales executives will be asked to enter the “decision making role” of the target contact. Choose the decision making framework that is most familiar to your organization.
IMPORTANT: Once this is set, do NOT change this setting. If you change this setting, all the work your team has entered in the Power Base section will be eliminated.
Options for decision matrix settings:
- Default:
- Buyer
- Influencer
- RAPID: Additional Information
- Recommend
- Agree
- Perform
- Input
- Decide
- RACI:
- Responsible
- Accountable
- Consulted
- Informed
- ABCDE
- Approver
- Business Driver
- Champion
- Domino
- Evaluator